This blog post will cover the fifth, sixth, and seventh part of the original LLVM tutorial that was originally written in C++.
The next order of business for our model language, Kaleidoscope, is extending it with a variety of features that will allow us to promote it from a basic calculator with JIT compilation into a bonafide language capable of much more.
This next blog post will cover a variety of advanced topics, and will require some firm understanding of compiler concepts in general. Due to this, it might be of benefit to read about:
- Basic Blocks, Program Control Flow
- Single Static Assignment (SSA) Form
- General knowledge about the stack, heap, registers, calling conventions
- Basic x86_64 Assembly
Code for this series of blog posts can be found at https://github.com/acolite-d/llvm-tutorial-in-rust-using-inkwell/tree/main
Adding Control Flow
Perhaps one of the cornerstones of any serviceable language, control flow is incredibly important and necessary. Without control flow, we lack the ability to give our CPU the ability to make decisions and execute code conditionally. Without decision making, our language is no better than a calculator to punch numbers in. We cannot really create any algorithms or solve any real-world problems without such feature. The first extension will fix this with the addition of if-else-then expressions and for-loops.
If-Then-Else Expressions
Part 5 in the original tutorial sees us adding an if-then-else extension to the language. These new expressions will allow for conditional execution. The tutorial demonstrates this with some example code for a recursive function of Fibonacci numbers:
def fib(x)
  if x < 3 then
    1
  else
    fib(x-1)+fib(x-2);
To implement this, we need to go back to some of the early code we produced for our lexer-parser and AST. These are new keywords to our language, which demand updates to lexer. So let’s begin there.
// in lexer.rs

#[repr(u8)]
#[derive(Debug, Clone, Copy, PartialEq)]
pub enum Token<'src> {
    FuncDef = 1,
    Extern = 2,
    //...

    // New keywords for control flow!
    If = 10,
    Then = 11,
    Else = 12,
    Unknown(&'src str) = 255,
}

#[inline(always)]
fn tokenize(string: &str) -> Token {
    use Token::*;

    match string {
        // Keywords
        "def" => FuncDef,
        "extern" => Extern,
        "if" => If,
        "then" => Then,
        "else" => Else,
        "for" => For,
        "in" => In,

        // Operators
        //...
These additions will allow us to identify these new keywords, instead of having them lex into Unknown(&’sr str) variants, which results in errors. With changes to the lexer, the next order of business is to identify these new tokens with the parser, which will generate new IfExpr nodes in our AST. This expression takes the form of three keywords, each punctuated with an expression. The first expression following the IF is the predicate, which is the expression to be evaluated to either true or false. The next, following the THEN keyword is the true case, then after ELSE is the expression to evaluate for the false case.
// in ast.rs
#[derive(Debug, Clone, PartialEq)]
pub enum ASTExpr<'src> {
    NumberExpr(f64),
    VariableExpr(&'src str),
    // ...
    // ifexpr ::= 'if' expression 'then' expression 'else' expression
    IfExpr {
        cond: Box<ASTExpr<'src>>,
        then_branch: Box<ASTExpr<'src>>,
        else_branch: Box<ASTExpr<'src>>,
    },
}

// in parser.rs
/// primary
///   ::= identifierexpr
///   ::= numberexpr
///   ::= parenexpr
///   ::= ifexpr
fn parse_primary<'src>(
    tokens: &mut Peekable<impl Iterator<Item = Token<'src>>>,
) -> ExprParseResult<'src> {
    match tokens.peek() {
        Some(Token::Identifier(_)) => parse_identifier_expr(tokens),

        Some(Token::Number(_)) => parse_number_expr(tokens),

        Some(Token::OpenParen) => parse_paren_expr(tokens),

        Some(Token::If) => parse_if_expr(tokens),

        None => Err(ParserError::UnexpectedEOI),
    }
}

fn parse_if_expr<'src>(
    tokens: &mut Peekable<impl Iterator<Item = Token<'src>>>,
) -> ExprParseResult<'src> {
    let Some(Token::If) = tokens.next() else {
        return Err(ParserError::ExpectedToken(&"if"));
    };

    let cond = parse_expression(tokens)?;

    let Some(Token::Then) = tokens.next() else {
        return Err(ParserError::ExpectedToken(&"then"));
    };

    let then_branch = parse_expression(tokens)?;

    let Some(Token::Else) = tokens.next() else {
        return Err(ParserError::ExpectedToken(&"else"));
    };

    let else_branch = parse_expression(tokens)?;

    Ok(Box::new(ASTExpr::IfExpr {
        cond,
        then_branch,
        else_branch,
    }))
}
With these changes to our frontend, we have reflected this new addition in the resulting AST. If we were to debug print these expressions, they take this form:
Ready >> if 2 > 1 then 1 else 0;
Abstract Syntax Tree Representation:
Function {
    proto: FunctionProto {
        name: "__anonymous_expr",
        args: [],
    },
    body: IfExpr {
        cond: BinaryExpr {
            op: Gt,
            left: NumberExpr(
                2.0,
            ),
            right: NumberExpr(
                1.0,
            ),
        },
        then_branch: NumberExpr(
            1.0,
        ),
        else_branch: NumberExpr(
            0.0,
        ),
    },
}
All that’s left is defining how these new nodes in our tree will emit IR. This is where the tutorial introduces the idea of PHI Nodes.
LLVM PHI Nodes
PHI nodes constitute the backbone of control flow for an SSA form program such as our LLVM IR. Recall that SSA values are immutable, and are only assigned a value once. This makes programming decision making and control flow a bit difficult as one might imagine. Observe this simple C program:
/* return the minimum of the two numbers */
int min(int a, int b) {
    if (a < b) {
        return a;
    } else {
        return b;
    }
}

// How might this work in SSA form?
One might be tempted to take the functions values, perform a comparison of the two using the icmp IR instruction, then branch to two different basic blocks that both set the return value like below:
define i32 @min(i32 noundef %0, i32 noundef %1) {
    # compare the two integeres with icmp, use "slt" signed less than
    %predicate = icmp slt i32 %0, %1

    # branch to true basic block if true, false basic block if false
    br i1 %predicate, label %truebb, label %falsebb

    truebb:
        %retval = %a
        br label %end

    falsebb:
        %retval = %b
        br label %end

    end:
        ret i32 %retval
}
Unfortunately, this is illegal IR. We have assigned an SSA value twice, the %retval register, once in the truebb basic block and once again in the falsebb basic block. SSA means single static assignment–we can only assign a value a single time, even when the assignment can be partitioned across these basic blocks where the assignment logically happens only once.
Enter PHI nodes, a special LLVM instruction and general SSA theory component that when utilized allows us to set a SSA value based on the traversed control flow of the program.
define i32 @min(i32 noundef %0, i32 noundef %1) {
    # compare the two integeres with icmp, use "slt" signed less than
    %predicate = icmp slt i32 %0, %1

    # branch to true basic block if true, false basic block if false
    br i1 %predicate, label %truebb, label %falsebb

    truebb:
        br label %end

    falsebb:
        br label %end

    end:
        # if we took the path to the truebb basic block, set to %a
        # if we took the path to the falsebb basic block, set to %b
        %retval = phi i32 [%a, %truebb], [%b, %falsebb]
        return i32 %retval
}
The phi instruction here accepts groups of SSA values and basic block names, then assigns the return value based on the path we just traversed in the function’s basic blocks. As you can see, this is a necessary construct that, although does not allow us to break the rules of assigning a SSA register multiple times, it does allow us to assign a SSA register to different values on one line.
The If-Else-Then expressions we are trying to build will work in a similar way. Using a series of basic blocks and PHI nodes, the Kaleidoscope language will emit IR for a conditional expression. Let’s go to our implementation of codegen and add a match pattern for our recently constructed IfExpr AST node. Start by generating the conditional expression that will be the predicate of the branch.
impl<'ctx, 'ir, 'src> LLVMCodeGen<'ctx, 'ir, 'src> for ASTExpr<'src>
where
    'ctx: 'ir,
{
    fn codegen(&self, context: &LLVMContext<'ctx>)
        -> IRGenResult<'ir, 'src>
    {

        use ASTExpr::*;

        match self {

            NumberExpr(num) => { /*...*/ }
            VariableExpr(varname) => { /*...*/ }

            //...the rest of the nodes we covered previously

            IfExpr { cond, then_branch, else_branch } => {
                let cond_codegen = cond.codegen(context)?;

                let zero = context.context.f64_type().const_float(0.0);

                // Compute the truth of the condition by
                // checking if value is non-zero, like C
                let cond_bool = context.builder.build_float_compare(
                    FloatPredicate::ONE,
                    cond_codegen.into_float_value(),
                    zero,
                    &"iftemp"
                )
                .expect("FATAL: LLVM failed to build float compare!");

                //...
            }
Above we call codegen on the conditional part of the IfExpr. Then we build a comparison instruction to check if the condition is a non-zero value. Like C, the predicate of an if statement can be any expression, from if (x < 5) to call expressions like if (is_odd()) as well as a numbers like if (1). All of these expressions evaluate to a float value that can be compared to zero. From here, we can build a conditional branch instruction that takes the result of the comparison and branches to either then or else accordingly.
But before we can actually branch, we first create a series of basic blocks that will contain the code of our branches, our else and then expressions.
IfExpr { cond, then_branch, else_branch } => {

//...

// Basic blocks to be added for this branch
// true path - 1, not true - 2, merge - 3
let bbs = [&"then", &"else", &"ifcont"]
    .into_iter()
    .map(|bb_name| context.context.append_basic_block(function, bb_name))
    .collect::<Vec<BasicBlock<'ctx>>>();

context.builder.build_conditional_branch(
    cond_bool, bbs[0], bbs[1]
).expect("FATAL: LLVM failed to build br instruction!");

// IMPORTANT: Be sure you set the builder cursor to the appropriate block
// before calling codegen() methods on then and else expressions, otherwise
// we would generate code in wrong basic block and mess everything up.
context.builder.position_at_end(bbs[0]);
let then_v = then_branch.codegen(context)?;

// Don't forget to branch back to merge basic block!!!
context.builder.build_unconditional_branch(bbs[2])
  .expect("FATAL: LLVM failed to build branch!");

context.builder.position_at_end(bbs[1]);
let else_v = else_branch.codegen(context)?;

context.builder.build_unconditional_branch(bbs[2])
  .expect("FATAL: LLVM failed to build branch!");
Above we create 3 basic blocks that contain the then branch to execute when the predicate is true, the else branch when the predicate is false, then the basic block to “merge” and add PHI node. I store them in fixed Rust array named bbs.
After that, a conditional branch instruction is built with the builder method build_conditional_branch. Later, we use the builder methods position_at_end to control which basic block is the target we write our LLVM instructions. The builder is much like a cursor of sorts, where we can control its position within the range of basic blocks of our function. This is important for making sure our then and and else expressions generate in their respective basic blocks, so we move the cursor to the start of the appropriate block before calling codegen on both the then and else expressions. After this, we add an unconditional branch to terminate the basic blocks, allowing both the then and else code paths to jump to a common point, the ifcont basic block.
It is at this common point where we will add our PHI node. the build_phi method of the Inkwell Builder object enables us to build one such node. With a PHI node created, we then add the then and else LLVM values to the node with the add_incoming, which accepts tuples of (LLVM value, basic block), with each value being associated with a particular basic block.
IfExpr { cond, then_branch, else_branch } => {

//...

// Position the cursor at the ifcont basic block, the merge point
// where both the then and else basic blocks jump to
context.builder.position_at_end(bbs[2]);

// Construct a PHI node
let phi_node = context.builder.build_phi(
    context.context.f64_type(), &"iftmp"
).expect("LLVM failed to create PHI!");

// Add so called "edges" to PHI node, calling syntax a bit odd here
// but illustrates that any LLVM basic value can be inserted into PHI
// Each value is associated with a basic block
phi_node.add_incoming(&[
    (&then_v.into_float_value() as &dyn BasicValue<'ctx>, bbs[0]),
    (&else_v.into_float_value() as &dyn BasicValue<'ctx>, bbs[1]),
]);

// Return the PHI node
Ok(phi_node.as_any_value_enum())

}
This all may be a bit overwhelming, but really is simple if you just visualize the process of this IR code generation via some illustration. This is just a patch work of branching, basic blocks, and the previously discussed PHI nodes. Below is a graph of sorts representing the control flow of a simple IF-THEN-ELSE expression.
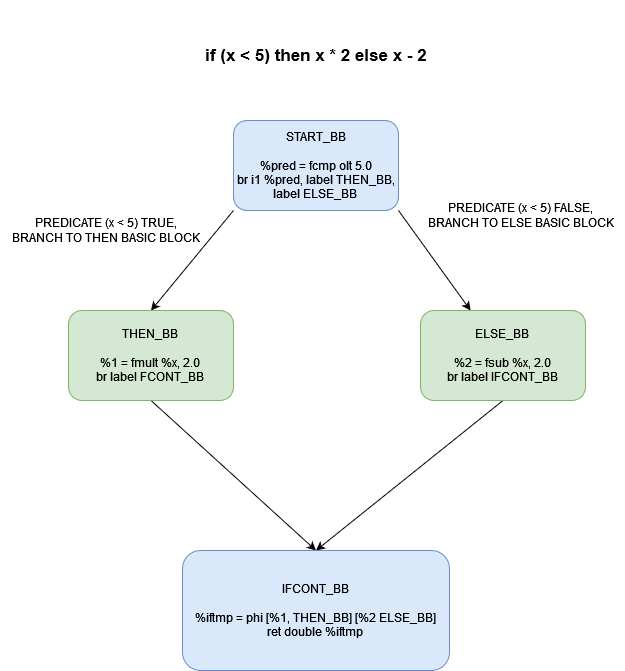
Thus, PHI nodes allow us to assign a SSA register values conditionally, depending on the path of basic blocks a program takes.
Testing If-Then-Else with a Recursive Function that Calculates Fibonacci Numbers
Now that we can harness the power of decision making this simply control flow construct, we can implement some powerful recursive algorithms. Recursion was technically available to us before this, but without a way to stop recursion, Kaleidoscope would just blow the stack each time you would do anything recursive. With a simple If-Then-Else, we can decide when to stop the recursive calls.
Ready >> def fib(num) if num < 3 then 1 else fib(num-1)+fib(num-2);
Parsed a function definition.
; ModuleID = 'kaleidrs_module'
source_filename = "kaleidrs_module"

define double @fib(double %num) {
entry:
  %lttmp = fcmp olt double %num, 3.000000e+00
  br i1 %lttmp, label %ifcont, label %else

else:                                             ; preds = %entry
  %subtmp = fadd double %num, -1.000000e+00
  %calltmp = call double @fib(double %subtmp)
  %subtmp1 = fadd double %num, -2.000000e+00
  %calltmp2 = call double @fib(double %subtmp1)
  %addtmp = fadd double %calltmp, %calltmp2
  br label %ifcont

ifcont:                                           ; preds = %entry, %else
  %iftmp = phi double [ %addtmp, %else ], [ 1.000000e+00, %entry ]
  ret double %iftmp
}

Ready >> fib(15);
Parsed a top level expression.
; ModuleID = 'kaleidrs_module'
source_filename = "kaleidrs_module"

define double @fib(double %num) {
entry:
  %lttmp = fcmp olt double %num, 3.000000e+00
  br i1 %lttmp, label %ifcont, label %else

else:                                             ; preds = %entry
  %subtmp = fadd double %num, -1.000000e+00
  %calltmp = call double @fib(double %subtmp)
  %subtmp1 = fadd double %num, -2.000000e+00
  %calltmp2 = call double @fib(double %subtmp1)
  %addtmp = fadd double %calltmp, %calltmp2
  br label %ifcont

ifcont:                                           ; preds = %entry, %else
  %iftmp = phi double [ %addtmp, %else ], [ 1.000000e+00, %entry ]
  ret double %iftmp
}

define double @__anonymous_expr() {
entry:
  %calltmp = call double @fib(double 1.500000e+01)
  ret double %calltmp
}
Jit compiled and evaluated to: 610
Impressive no? We are able to calculate the 15th fibonacci number by JITing the above IR and running it directly on CPU. The stop expression for recursion with the then expression allows us to return and travel up the stack. Note that LLVM seemed to optimize the then basic block away here, but the rest of the IR we instructed the builder to create is here.
For-Loop Expressions
Next to the if-else, loops are another household language feature that demonstrates a particular type of control flow: A decision to repeatedly execute a piece of code until a predicate no longer holds true. Like if-else, this is also powered by basic constructs like conditional branching and basic blocks of instructions, and yes, PHI nodes. Same materials, just a different design.
extern putchard(char);

def printstar(n)
  for i = 1, i < n, 1.0 in
    putchard(42);  # ascii 42 = '*'

# print 100 '*' characters
printstar(100);
If one is familiar with the basic incremental for-loops seen in C or Java, then this should look quite familiar. You have your basic initialization of a variable, a predicate to evaluate to decide whether to loop or to exit, and a simply expression representing a value to increment by, in the above case, by 1.0. There are two new keywords on both sides of this expression, “for” and “in”. The expression following in is the operation to loop on.
Let’s start with some basic changes to our parser and AST. Like if-then-else, this is another set of trivial changes that are quite short. Identify new keyword tokens, identify new ForLoop expressions as possible nodes in the AST, direct parser to handle for keyword by calling a function that will attempt to parse a for loop expression and create a new node in AST.
// in lexer.rs

#[repr(u8)]
#[derive(Debug, Clone, Copy, PartialEq)]
pub enum Token<'src> {
    FuncDef = 1,
    Extern = 2,
    Identifier(&'src str) = 3,

    //...
    For = 13,
    In = 14,
    Unknown(&'src str) = 255,
}

#[inline(always)]
fn tokenize(string: &str) -> Token {
    use Token::*;

    assert!(string.len() != 0);

    match string {
        // Keywords
        "def" => FuncDef,
        "extern" => Extern,
        "if" => If,
        "then" => Then,
        "else" => Else,
        "for" => For,
        "in" => In,

        // Operators
        // ...
    }
}

// in ast.rs
#[derive(Debug, Clone, PartialEq)]
pub enum ASTExpr<'src> {
    NumberExpr(f64),
    VariableExpr(&'src str),
    //...
    ForLoopExpr {
        varname: &'src str,
        start: Box<ASTExpr<'src>>,
        end: Box<ASTExpr<'src>>,
        step: Box<ASTExpr<'src>>,
        body: Box<ASTExpr<'src>>,
    }
}
// in parser.rs
/// forexpr ::= 'for' identifier '=' expression ',' expression (',' expr)? 'in' expression
fn parse_for_loop_expr<'src>(
tokens: &mut Peekable<impl Iterator<Item = Token<'src>>>
) -> ExprParseResult<'src> {
let Some(Token::For) = tokens.next() else {
return Err(ParserError::ExpectedToken(&"for"));
};
let Some(Token::Identifier(varname)) = tokens.next() else {
return Err(ParserError::ExpectedToken(&"variable"));
};
let Some(Token::Operator(Ops::Eq)) = tokens.next() else {
return Err(ParserError::ExpectedToken(&"="));
};
let start = parse_expression(tokens)?;
let Some(Token::Comma) = tokens.next() else {
return Err(ParserError::ExpectedToken(&","));
};
let end = parse_expression(tokens)?;
// The Step expression is optional, if one is not supplied, assume
// step is just 1.0, or adds one each loop
let step = {
if let Some(Token::Comma) = tokens.next_if(
|token| matches!(token, Token::Comma))
{
parse_expression(tokens)?
} else {
Box::new(ASTExpr::NumberExpr(1.0))
}
};
let Some(Token::In) = tokens.next() else {
return Err(ParserError::ExpectedToken(&"in"));
};
let body = parse_expression(tokens)?;
Ok(Box::new(ASTExpr::ForLoopExpr {
varname,
start,
end,
step,
body
}))
}
// This is yet another primary expression to add
/// primary
/// ::= identifierexpr
/// ::= numberexpr
/// ::= parenexpr
/// ::= ifexpr
/// ::= forloopexpr
fn parse_primary<'src>(
tokens: &mut Peekable<impl Iterator<Item = Token<'src>>>,
) -> ExprParseResult<'src> {
match tokens.peek() {
Some(Token::Identifier(_)) => parse_identifier_expr(tokens),
Some(Token::Number(_)) => parse_number_expr(tokens),
Some(Token::OpenParen) => parse_paren_expr(tokens),
Some(Token::If) => parse_if_expr(tokens),
Some(Token::For) => parse_for_loop_expression(tokens),
Some(unexpected) => Err(ParserError::UnexpectedToken(*unexpected)),
None => Err(ParserError::UnexpectedEOI),
}
}Much like the components of the If-Then-Else expression, the start, end, step, and body expressions of a for loop need to call the codegen method in a certain order, with the builder’s basic block cursor pointing to the correct location. There is quite a bit to break down across these 4 expressions and variable name, so let’s make note of a few important points:
- These expressions will always evaluate to a value of 0.0. Where the if expressions evaluated to a PHI node value that split across then and else, this expression has no real value, and really just executes code in a loop, returning zero from it.
- Like a traditional for-loop you would see if Java or C, there is a variable associated with the loop that acts as a counter of sorts (varname). It is through this variable, defined by the start expression, that the loop can control iteration. According to the original tutorial’s implementation of the loop, this variable can shadow other variables in the same scope. Giving it a higher priority scope.
- The body expression represents the body of the loop, the thing you want to execute N times.
- The end expression represents some predicate that, if true, continues the loop, and when false, breaks from the loop.
- Step is an optional expression and can be omitted. It represents how we increment the start expression. In the absence of a defined step, we add 1.0 to start.
Considering these points, we can start to craft a specific order of code generation:
start.codegen() -> shadow varname in sym table -> body.codegen() -> step.codegen() -> end.codegen()
The question of where to generate the IR from these expressions with codegen is equally important. This will require two basic blocks: one basic block that can branch to itself, loop the body, the step, and the end code, and another to fall thru when we have decided to not loop anymore and return 0. We can create a simple state machine or control flow graph that can capture the logic at high level.
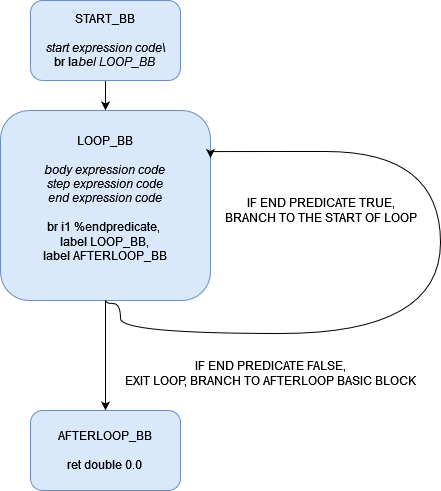
Note that the code generated from the expressions could be any sequence of IR instructions. Below is the final code that tries to capture the above control flow graph.
ForLoopExpr { varname, start, end, step, body } => {
    // codegen the start first, in the current basic block
    let start_genval = start.codegen(context)?;

    let preheader_bb = context.builder.get_insert_block().unwrap();
    let function = preheader_bb.get_parent().unwrap();

    // Create a new basic block that will contain the loop code
    // body, step, then end.
    let loop_bb = context.context.append_basic_block(function, &"loop");

    // Make an unconditional branch to the loop
    context.builder.position_at_end(preheader_bb);
    context.builder.build_unconditional_branch(loop_bb)
        .expect("FATAL: LLVM failed to build branch!");

    context.builder.position_at_end(loop_bb);

    let loop_phi_var = context.builder.build_phi(context.context.f64_type(), varname)
        .expect("FATAL: LLVM failed to create PHI!");

    loop_phi_var.add_incoming(&[
        (&start_genval.into_float_value() as &dyn BasicValue<'ctx>, preheader_bb)
    ]);

    let shadowed_var = context.sym_table.borrow().get(*varname).copied();
    context.sym_table.borrow_mut()
        .insert(varname.to_string(), loop_phi_var.as_any_value_enum());

    // Generate the body
    body.codegen(context)?;


    // Generate the step
    step.codegen(context)?;

    // Increment the loop variable by adding the step value.
    let next_var = context.builder.build_float_add(
        loop_phi_var.as_basic_value().into_float_value(),
        step_genval.into_float_value(),
        &"nextvar"
    ).unwrap();

    // Generate the end expression
    let end_cond = end.codegen(context)?;

    // Create a conditional branch that will branch back
    // to the start of the loop if true, branch to afterloop
    // if false, start by getting the comparison.
    let cmp_val = context.builder.build_float_compare(
        FloatPredicate::ONE,
        end_cond.into_float_value(),
        context.context.f64_type().const_float(0.0),
        &"loopcond"
    ).expect("FATAL: LLVM failed to build comparison instruction!");

    let afterloop_bb = context.context.append_basic_block(function, "afterloop");

    context.builder.position_at_end(loop_bb);

    context.builder.build_conditional_branch(
      cmp_val, loop_bb, afterloop_bb)
    .unwrap();

    context.builder.position_at_end(afterloop_bb);

    loop_phi_var.add_incoming(&[
        (&next_var as &dyn BasicValue<'ctx>, afterloop_bb)
    ]);

    if let Some(variable) = shadowed_var {
        context.sym_table.borrow_mut().insert(
          varname.to_string(), variable
        );
    } else {
        context.sym_table.borrow_mut().remove(*varname);
    }

    // Return 0.0 for every loop expression.
    Ok(
        context.context.f64_type().const_float(0.0).as_any_value_enum()
    )
}
There you have it. This took a little bit more effort due to the number of expressions, but still uses the same LLVM constructs the If-Then-Else expressions were composed of.
kaleidrs$ cargo run -- --inspect-ir
    Finished `dev` profile [unoptimized + debuginfo] target(s) in 0.02s
     Running `target/debug/kaleidrs --inspect-ir`
Ready >> extern putchard(character);
LLVM IR Representation:
; ModuleID = 'kaleidrs_module'
source_filename = "kaleidrs_module"

declare double @putchard(double)

Ready >> def printstar(cnt) for i = 0, i < cnt, 1.0 in putchard(42);
LLVM IR Representation:
; ModuleID = 'kaleidrs_module'
source_filename = "kaleidrs_module"

declare double @putchard(double)

define double @printstar(double %cnt) {
entry:
  br label %loop

loop:                                             ; preds = %loop, %entry
  %i2 = phi double [ %nextvar, %loop ], [ 0.000000e+00, %entry ]
  %calltmp = call double @putchard(double 4.200000e+01)
  %lttmp = fcmp olt double %i2, %cnt
  %nextvar = fadd double %i2, 1.000000e+00
  br i1 %lttmp, label %loop, label %afterloop

afterloop:                                        ; preds = %loop
  ret double 0.000000e+00
}

Ready >> printstar(100);
LLVM IR Representation:
; ModuleID = 'kaleidrs_module'
source_filename = "kaleidrs_module"

declare double @putchard(double)

define double @printstar(double %cnt) {
entry:
  br label %loop

loop:                                             ; preds = %loop, %entry
  %i2 = phi double [ %nextvar, %loop ], [ 0.000000e+00, %entry ]
  %calltmp = call double @putchard(double 4.200000e+01)
  %lttmp = fcmp olt double %i2, %cnt
  %nextvar = fadd double %i2, 1.000000e+00
  br i1 %lttmp, label %loop, label %afterloop

afterloop:                                        ; preds = %loop
  ret double 0.000000e+00
}

define double @__anonymous_expr() {
entry:
  %calltmp = call double @printstar(double 1.000000e+02)
  ret double %calltmp
}

*
*
*
*
// omitted the rest of the 92 asterisks
*
*
*
*
Jit compiled and evaluated to: 0
Ready >>
Extending Operators
With control flow out of the way, that puts us, with respect to the original LLVM tutorial, at the beginning of chapter 6. This next chapter deals with another addition to the language: user-defined operators (unary expressions are also somewhat stealthily implemented here in the same breath).
I confess that, upon reading through chapter 6 of the original tutorial, I was a bit surprised to find this to be the third addition to our language. I myself (and probably the average software developer as well I would assume) have little knowledge of overloading operators or defining your own outside of reading about it in programming language documentation or learning it for a college class. I cannot recall a single time I have actually gone out of my way to overload any operator in any codebase, professional or otherwise. I have certainly interacted with third party libraries in the past that do have overloaded operators, but never saw any reason to implement such logic myself. For me, it was enough that primitive types like integers and floats implemented most of these operators, and functions/methods satisfied whatever I needed to do with my structs/classes.
I believe that, for a mature library author, this feature does see use. However, due to the nature of operator overloading, so-called “end-user application authors” shy away from such technology for two reasons:
// A short demonstration of how to define operator logic in Python

class Point:
    def __init__(self, x, y):
        self.x = x
        self.y = y

    // In python, special dunder methods exist for overloading operators
    // for arbitrary, non-primitive objects like our point.
    // Dunder methods like __add__, __sub__, __mul__, so on...
    def __mul__(self, other):
        return Point(self.x * other.x, self.y * other.y)

p1 = Point(1,2)
p2 = Point(-3,4)

p3 = p1 * p2- It is rarely obvious what an overloaded operator might do between two objects. Both in terms of what it calculates and what it returns. Imagine this scenario in whatever language: a Point(x, y) class that has a overloaded multiplication operator. Some users might feel that multiplying two points p1 * p2, might produce a new Point (x1*x2, y1*y2). But another (and perhaps more mathematically valid) take would be that it returns not another point, but a Vector object, representing the multiplication of two scalar values. This requires users to read the fine lines, and becomes an knowledge check brought upon by the library, not the language.
- Designing functions/methods that perform such operations is far more transparent. For example, taking the above Point class and just adding a method that bears the signature scalar_mult(self, other_point: Point) -> Vector might cause less confusion and less mistakes.
Even so, I believe the original tutorial’s intention isn’t to follow-up control flow as the logical next feature, but show how easy it easy to immediately implement something so off the cuff to prove LLVM can easily implement any feature in a trivial language.
# Logical unary not.
def unary!(v)
  if v then
    0
  else
    1;

# Define > with the same precedence as <.
def binary> 10 (LHS RHS)
  RHS < LHS;

# Binary "logical or", (note that it does not "short circuit")
def binary| 5 (LHS RHS)
  if LHS then
    1
  else if RHS then
    1
  else
    0;
At a high level, how user-defined operators work is like this:
- Users will define their operator logic through function signatures like the above, where all the necessary information, like the operator symbol and precedence will be supplied. For binary operators, the signature will accept two parameters for left and right hand sides of the operator. The body of the function is the logic of the operator.
- The signature will be parsed out into the tree, where the tree will generate the function body and add a function to the LLVM module under name binary<operator>.
- When parsing binary expressions, if the user-defined operator is detected in the expression, a lookup is done in the LLVM module to make sure the operator in question is defined. If there exists a function with name binary<operator>, a LLVM call instruction will be built with both left and right hand sides of the expression being passed to the call as arguments to a function. If not, then an error is thrown, telling user the operator is not defined yet.
Much like the “dunder” methods of Python, these functions operate by accepting both left and right hand side arguments, then executing some expression against them to produce a result. They are identified by two new keywords, “unary” and “binary”. Unary expressions do not even exist our language yet, but will be implemented after overloaded binary operators are. Note that when overloading a binary operator, you provide both the operator symbol and the precedence it has in relation to other binary operators.
Start by adding the aforementioned keywords. There will also be a need to identify a set of operators that are free to be overloaded by users at their discretion: “| & ^ ! :“
// lexer.rs

#[repr(u8)]
#[derive(Debug, Clone, Copy, PartialEq)]
pub enum Token<'src> {
    FuncDef = 1,
    Extern = 2,
    Identifier(&'src str) = 3,
    Number(f64) = 4,
    Operator(Ops) = 5,
    OpenParen = 6,
    ClosedParen = 7,
    Comma = 8,
    Semicolon = 9,
    If = 10,
    Then = 11,
    Else = 12,
    For = 13,
    In = 14,
    UnaryOverload = 15,
    BinaryOverload = 16,
    Unknown(&'src str) = 255,
}

#[repr(u8)]
#[derive(Debug, Clone, Copy, PartialEq, Eq, Hash)]
pub enum Ops {
    // General math on floating point values
    Plus = 0,
    Minus = 1,
    Mult = 2,
    Div = 3,

    // Comparison of floating point values
    Eq = 4,  // Let's use the C conventional "=="
    Neq = 5, // Let's use "!="
    Lt = 6,  // "<"
    Gt = 7,  // ">"

    // These operators are left undefined, but can be defined by users
    Or = 9,      // "|"
    And = 10,    // "&"
    Xor = 11,    // "^"
    Negate = 12, // "!"
    Colon = 13,  // ":"
}

// Update tokenize() as well...
There is an important distinction to be made between the existing operators we had before, like +, -, and the operators we are introducing as free-use to overload and implement user-defined logic. While it is possible to allow users to redefine the existing ones, our language has only one float type, and there are only so few ways to re-implement addition, subtraction, and other basic mathematical operations for floats that isn’t nefarious…
Now, as for the AST and parser, the overloaded operator is defined by a function as you saw above. Just like a normal function, save for a keyword and a precedence value. The original tutorial adds this new type of function prototype to the code by just slapping a few new members to the existing Prototype AST structure. This means that all prototypes, including the non-operator functions, have these members. Observe the tutorial’s C++ code below.
/// PrototypeAST - This class represents the "prototype" for a function,
/// which captures its argument names as well as if it is an operator.
class PrototypeAST {
  std::string Name;
  std::vector<std::string> Args;
  bool IsOperator;
  unsigned Precedence;  // Precedence if a binary op.

public:
  PrototypeAST(const std::string &Name, std::vector<std::string> Args,
               bool IsOperator = false, unsigned Prec = 0)
  : Name(Name), Args(std::move(Args)), IsOperator(IsOperator),
    Precedence(Prec) {}

  Function *codegen();
  const std::string &getName() const { return Name; }

  bool isUnaryOp() const { return IsOperator && Args.size() == 1; }
  bool isBinaryOp() const { return IsOperator && Args.size() == 2; }

  char getOperatorName() const {
    assert(isUnaryOp() || isBinaryOp());
    return Name[Name.size() - 1];
  }

  unsigned getBinaryPrecedence() const { return Precedence; }
};
This was rather messy in my opinion. I saw it more fit to translate this to Rust by first changing this Prototype structure to yet another enum with distinct variants, just like ASTExpr. This makes each type of prototype more distinct.
// Prototype, mimics that off the tutorial C++ class
#[derive(Debug, PartialEq)]
pub enum Prototype<'src> {
    FunctionProto {
        name: &'src str,
        args: Vec<&'src str>,
    },
    OverloadedBinaryOpProto {
        operator: Ops,
        args: (&'src str, &'src str),
        precedence: i32,
    },
}

use Prototype::*;

impl<'src> Prototype<'src> {
    pub fn get_name(&self) -> String {
        match self {
            FunctionProto { name, .. }
              => format!("{}", name),

            OverloadedBinaryOpProto { operator, .. }
              => format!("binary{}", operator.as_str()),
        }
    }

    pub fn get_num_params(&self) -> usize {
        match self {
            FunctionProto { args, .. } => args.len(),
            OverloadedBinaryOpProto { .. } => 2,
        }
    }
}
This newer prototype structure is created via the recursive descent parser through this new function for handling signatures. The parser creates the tree by first parsing out the two important definitions of the operator. The first is what the operator in question is (!&|^), and the second is its precedence, parsed as a signed 32 bit integer. We need to update the static reference OP_PRECEDENCE, the hash map containing the operator->precedence values that allow us to remember the correct precedence for each operator. We also confirm that the signature for this operator definition contains exactly two parameters to represent the left and right sides of the binary expression.
/// prototype
///   ::= id '(' id* ')'
///   ::= binary LETTER number? (id, id)
pub fn parse_prototype<'src>(
    tokens: &mut Peekable<impl Iterator<Item = Token<'src>>>,
) -> Result<Box<Prototype<'src>>, ParserError<'src>> {
    match tokens.next() {
        // The normal signature
        Some(Token::Identifier(name)) => {
            let _ = tokens
                .next_if(|t| matches!(t, Token::OpenParen))
                .ok_or(ParserError::ExpectedToken(&"("))?;

            let mut args = vec![];

            while let Some(Token::Identifier(s)) = tokens.peek() {
                args.push(*s);
                let _ = tokens.next();
            }

            let _ = tokens
                .next_if(|t| matches!(t, Token::ClosedParen))
                .ok_or(ParserError::ExpectedToken(&")"))?;

            Ok(Box::new(Prototype::FunctionProto { name, args }))
        }

        // The binary operator definition signature
        Some(Token::BinaryOverload) => {
            let Some(Token::Operator(operator)) = tokens.next() else {
                return Err(ParserError::ExpectedToken("!/&/|/^/:"));
            };

            let Some(Token::Number(precedence)) = tokens.next() else {
                return Err(ParserError::BadOverloadedBinaryOp);
            };

            // Take the precedence and update the map of operator
            // precedence, associating it with the new value.
            let mut precedence_map = OP_PRECEDENCE.write().unwrap();

            precedence_map.insert(operator, precedence.ceil() as i32);

            // swallow open parenthesis
            let _ = tokens
                .next_if(|t| matches!(t, Token::OpenParen))
                .ok_or(ParserError::ExpectedToken(&"("))?;

            // The signature must have exactly two parameters,
            // as it is a binary operation on two values left, right
            let (
              Some(Token::Identifier(lhs)),
              Some(Token::Identifier(rhs))
            ) =
                (tokens.next(), tokens.next())
            else {
                return Err(ParserError::BadOverloadedUnaryOp);
            };

            // swallow closed parenthesis
            let _ = tokens
                .next_if(|t| matches!(t, Token::ClosedParen))
                .ok_or(ParserError::ExpectedToken(&")"))?;

            Ok(Box::new(Prototype::OverloadedBinaryOpProto {
                operator,
                precedence: precedence.ceil() as i32,
                args: (lhs, rhs),
            }))
        }

        Some(unexpected) => Err(ParserError::UnexpectedToken(unexpected)),
        None => Err(ParserError::UnexpectedEOI),
    }
}
The way this works is by treating these differently. When generating IR, we will first codegen both left and right hand sides of the binary expression, as we did before. When we inspect the operator, we will first match against all our normal, non-overload-able operators, and build the correct instruction if they match any of them. If they match a free use operator, then we will build a function call instead!
impl<'ctx, 'ir, 'src> LLVMCodeGen<'ctx, 'ir, 'src> for ASTExpr<'src>
where
    'ctx: 'ir,
{
    fn codegen(&self, context: &LLVMContext<'ctx>)
      -> IRGenResult<'ir, 'src>
{
// ...

BinaryExpr { op, left, right } => {
    let left_genval = left.codegen(context).map(AnyValueEnum::into_float_value)?;

    let right_genval = right.codegen(context).map(AnyValueEnum::into_float_value)?;

// First match the known operators
let resulting_value = match *op {
    Ops::Plus => { /*...*/ }

    Ops::Minus => { /*...*/ }
    //...the rest of the predefined operators

  // If none of the above match, it must be a user-defined one
  overloaded_op => {
      // First, we have to check if the operator has been
      // defined in module. if not, then we return error,
      // because we cannot use an operator that hasn't
      // been defined yet! Look it up under name "binary<operator>"
      let fn_name = format!("binary{}", overloaded_op.as_str());

      if let Some(binary_overload_fn)
        = context.module.get_function(&fn_name)
      {
          let args = [left_genval, right_genval]
              .into_iter()
              .map(|anyval| BasicMetadataValueEnum::FloatValue(anyval))
              .collect::<Vec<_>>();

          let overload_call = context
              .builder
              .build_call(binary_overload_fn, args.as_slice(), &"calltmp")
              .expect("FATAL: LLVM failed to build call!");

          Ok(overload_call.as_any_value_enum())
      } else {
          Err(BackendError::UndefinedOperator(overloaded_op))
      }
  }
This function name is resolved by just reading the operator in question, looking up the function name under “binary<operator symbol>”. Example: to generate the IR for “x | y”, we first lookup the function name “binary|” in the module. If it exists, we call that function, passing it x and y, creating a call instruction. If it does not exist, we throw an error stating that the operator has not been defined yet.
Below readers will find the code in action, where we implement a logical OR operator using the conventional “|” symbol as seen in the original tutorial. Notice the call instructions to the “binary|” function that allows this user-configurable operator.
Ready >> def binary| 5 (LHS RHS) if LHS then 1 else if RHS then 1 else 0;
LLVM IR Representation:
; ModuleID = 'kaleidrs_module'
source_filename = "kaleidrs_module"

define double @"binary|"(double %LHS, double %RHS) {
entry:
  %ifcond = fcmp ueq double %LHS, 0.000000e+00
  %ifcond5 = fcmp ueq double %RHS, 0.000000e+00
  %. = select i1 %ifcond5, double 0.000000e+00, double 1.000000e+00
  %iftmp9 = select i1 %ifcond, double %., double 1.000000e+00
  ret double %iftmp9
}

Ready >> 0 | 1;

define double @__anonymous_expr() {
entry:
  %calltmp = call double @"binary|"(double 0.000000e+00, double 1.000000e+00)
  ret double %calltmp
}

Jit compiled and evaluated to: 1

Ready >> 0 | 0;

define double @__anonymous_expr() {
entry:
  %calltmp = call double @"binary|"(double 0.000000e+00, double 0.000000e+00)
  ret double %calltmp
}

Jit compiled and evaluated to: 0

Ready >> 1 | 1;

define double @__anonymous_expr() {
entry:
  %calltmp = call double @"binary|"(double 1.000000e+00, double 1.000000e+00)
  ret double %calltmp
}

Jit compiled and evaluated to: 1
Ready >>
The second part of the original tutorial chapter covers an addition of unary expressions. These work in the exact same way as the the binary ones we covered, save for a new ASTExpr node called UnaryExpr and it’s accompanying codegen implementation. I will skip this for now, it should be fairly understandable as one reads the code on their own.
Mutability and User-defined Variables
The next chapter in the tutorial, chapter 7, addresses how to make our variables mutable, as well as add user-defined variables to Kaleidoscope. This addition is probably more useful than user-defined operators, but implementing it brings with it a interesting puzzle.
# Define ':' for sequencing: as a low-precedence operator that ignores
# operands and just returns the RHS.
def binary : 1 (x y) y;

# Recursive fib, we could do this before.
def fib(x)
  if (x < 3) then
    1
  else
    fib(x-1)+fib(x-2);

# Iterative fib w/ mutable variables
def fibi(x)
  var a = 1, b = 1, c in
  (for i = 3, i < x in
     c = a + b :
     a = b :
     b = c) :
  b;

# Call it.
fibi(10);
Again, this is where SSA format rears its ugly head and makes this idea of a “mutable variable” rather difficult. SSA registers in the IR can only be assigned once, and that’s it. LLVM values of this nature are immutable in nature. To quote the original tutorial, “there is no ‘non-SSA mode’ for it (LLVM).” PHI nodes could be used here, but it isn’t obvious how this might be implemented.
So this begs the question: if we want to implement a language with mutable variables, how do we accomplish this when our language compiles to an IR that underneath uses exclusively immutable SSA registers?
This is where LLVM memory objects are introduced, an important feature of the infrastructure that defines a whole host of LLVM instructions, types, and concepts.
The idea very similar to that of using heap memory in a simple C program. Think of the malloc function in C: calling this function returns a pointer to a piece of heap memory that you requested.
int* my_mem = malloc(sizeof(int));

*int = 123;

free(my_mem);
Using this pointer, you acquire a bit of memory that you are free to write/read to at your discretion. Much like C, a similar interface exists in LLVM where memory objects can be requested. Only, unlike C, stack memory, like heap memory, is explicitly asked for instead of automatically determined. The alloca LLVM instruction allocates memory onto the stack.
LLVM memory objects then can interface with two more instructions, store and load. With these instructions, you can effectively bypass the limitations of SSA values by using memory objects to freely read and write data.
define i32 @example() {
entry:
  %X = alloca i32           ; type of %X is i32*.
  ...
  %tmp = load i32, i32* %X  ; load the stack value %X from the stack.
  %tmp2 = add i32 %tmp, 1   ; increment it
  store i32 %tmp2, i32* %X  ; store it back
  ...
The underlying value of the SSA register %X here does not change, but the data it points to does. In some way, these memory objects can be thought of a C pointers, but they do not hold actual address values.
Thus, mutability can be performed by using LLVM memory objects and load and store instructions. If we are to use this means, we will have to redefine what variables are and how they operate on our LLVM backend.
Start by adding a small method to the LLVMContext object that inserts a stack allocated memory object.
fn create_entry_block_alloca(
    &self,
    function: FunctionValue<'ctx>,
    var_name: &str,
) -> PointerValue<'ctx> {
    let ir_builder = self.context.create_builder();
    ir_builder.position_at_end(function.get_first_basic_block().unwrap());

    let alloca_insn = ir_builder
        .build_alloca(self.context.f64_type(), var_name)
        .expect("FATAL: LLVM failed to build alloca instruction");

    alloca_insn
}
As seem in llvm_backend.rs, there is a hash map that keeps track of variables by associating them a string -> LLVMAnyValueEnum mapping. We want to use memory objects instead, which are represeted in the Inkwell library by PointerValue<‘ctx> types. Changing this mapping makes this a bit more straightforward for us when storing variables in the symbol table.
// Our context object that we will pass to recursive calls of codegen
// as we generate LLVM IR from our tree.
#[derive(Debug)]
pub struct LLVMContext<'ctx> {
    context: &'ctx Context,
    builder: Builder<'ctx>,
    module: Module<'ctx>,
    machine: TargetMachine,
    sym_table: RefCell<HashMap<String, PointerValue<'ctx>>>, // CHANGED!
}
From here, we need to observe every place we initialize or lookup variables in the code. Our IR must now adapt by making use of an LLVM load instruction every time we would like to read a VariableExpr value, as well as create memory objects using the recently created method create_entry_block_alloca. Below we change the codegen handling to build a load instruction for every VariableExpr we walk across in the tree.
impl<'ctx, 'ir, 'src> LLVMCodeGen<'ctx, 'ir, 'src> for ASTExpr<'src>
where
    'ctx: 'ir,
{
    fn codegen(&self, context: &LLVMContext<'ctx>)
        -> IRGenResult<'ir, 'src>
{

//...

// To handle variable case, make sure the variable exists in symbol table,
// if it doesn't return error, otherwise, fetch the LLVM Value for that variable
VariableExpr(varname) => {
    if let Some(pointer_val) = context.sym_table.borrow().get(*varname) {
        let load_insn = context
            .builder
            .build_load(context.context.f64_type(), *pointer_val, &varname)
            .expect("FATAL: LLVM failed to build load instruction");

        Ok(load_insn.as_any_value_enum())
    } else {
        Err(BackendError::UnknownVariable(varname))
    }
}
In addition to the changes of VariableExpr, we will have to change Function::codegen() as well. For each function we generate IR for, a series of alloca instructions must be intialized to copy over whatever variables are passed to it to the stack so that we do not mutate something in the callee that the caller then reads in. Please observe this portion of llvm_backend.rs. (There are also changes to the for-loop, which used a scope variable that must also become a memory object.)
But what about store instructions? Where do they fit in? In assignment expressions of course, where my_var = 5 will result in a store instruction that stuffs the constant value of 5 into the memory object of my_var. These will be interpreted as a specific case of a binary expression ASTExpr::BinaryExpr where only the right side calls codegen and recurses the subtree, while the left is interpreted as a symbol to look up the pointer value to use in the store instruction. This will also require a small update to lexer to identify the new assignment operator that can be used in binary expressions.
// Operators found here, tuple field of Token::Operator variant
#[repr(u8)]
#[derive(Debug, Clone, Copy, PartialEq, Eq, Hash)]
pub enum Ops {
    // General math on floating point values
    Plus = 0,
    Minus = 1,
    Mult = 2,
    Div = 3,

    // Comparison of floating point values
    Eq = 4,  // Let's use the C conventional "=="
    Neq = 5, // Let's use "!" + "="
    Lt = 6,  // "<"
    Gt = 7,  // ">"

    // Assignment "="
    Assign = 8,

    // These operators are left undefined,
    // but can be overloaded by developers
    Or = 9,      // "|"
    And = 10,    // "&"
    Xor = 11,    // "^"
    Negate = 12, // "!"
    Colon = 13,  // ":"
}
// Generate the left and right code first, then build the correct
// instruction depending on the operator.
BinaryExpr { op, left, right } => {
    // Assignments are special cases, we only want to codegen the right
    // then treat the left as a named symbol to store as variable name
    if let Ops::Assign = op {
        // Make sure left hand side is a valid, existing variable name
        let ptr_val = match **left {
            ASTExpr::VariableExpr(name) => context
                .sym_table
                .borrow()
                .get(name)
                .copied()
                .ok_or(BackendError::UnknownVariable(name)),

            _ => Err(BackendError::BadAssignment),
        }?;

        // Generate the right hand side, store its value in the variable, completeing assignment
        let right_genval = right.codegen(context)?;

        context
            .builder
            .build_store(ptr_val, right_genval.into_float_value())
            .expect("FATAL: LLVM failed to build store instruction");

        // Like C assignments, the right hand side is returned
        // so you have things like x = y = z = 1, where the three vars are all one
        // I personally hate this, but following the tutorial
        Ok(right_genval.as_any_value_enum())
    } else {
        // Generate both left hand and right hand sides of the expression first
        let left_genval =
            left.codegen(context).map(AnyValueEnum::into_float_value)?;
        let right_genval =
            right.codegen(context).map(AnyValueEnum::into_float_value)?;

        //... the normal cases of BinaryExpr follow, match on operator
With this, our IR now uses alloca to create LLVM memory objects, with use of load and store to read and mutate them respectively. ()
The Importance of the mem2reg Optimization Pass
Giving the ability to allow users to mutate variables is a solid feature. Despite our good intentions of extending the language, it does invite problems that could drastically effect the speed of our code if we are not running the right optimization passes.
Observe some the IR and resulting x86_64 assembly in this small sample function that accepts three paramters, all of which result in three distinct memory objects for that function scope:
kaleidrs$ cargo r -- --passes "" --inspect-ir --inspect-asm
    Finished `dev` profile [unoptimized + debuginfo] target(s) in 0.01s
     Running `target/debug/kaleidrs --passes "" --inspect-ir --inspect-asm`
Ready >> def test(v1 v2 v3) v1 * v2 * v3;
LLVM IR Representation:
; ModuleID = 'kaleidrs_module'
source_filename = "kaleidrs_module"

define double @test(double %v1, double %v2, double %v3) {
entry:
  %v11 = alloca double, align 8
  store double %v1, ptr %v11, align 8
  %v22 = alloca double, align 8
  store double %v2, ptr %v22, align 8
  %v33 = alloca double, align 8
  store double %v3, ptr %v33, align 8
  %multmp = fmul double %v1, %v2
  %multmp7 = fmul double %multmp, %v3
  ret double %multmp7
}

Assembly Representation:
        .text
        .file   "kaleidrs_module"
        .globl  test
        .p2align        4, 0x90
        .type   test,@function
test:
        .cfi_startproc
        movsd   %xmm0, -8(%rsp)
        movsd   %xmm1, -16(%rsp)
        movsd   %xmm2, -24(%rsp)
        mulsd   %xmm1, %xmm0
        mulsd   %xmm2, %xmm0
        retq
.Lfunc_end0:
        .size   test, .Lfunc_end0-test
        .cfi_endproc

        .section        ".note.GNU-stack","",@progbits


Ready >>
Note the presence of the alloca and store instructions in the IR that reflect the work we’ve done thus far to enable ourselves to make our variables mutable. They are introduced at the top of the function’s entry basic block. They copy the variables that were passed to the function, inserting them into new function scope specific memory objects. Then the three are multiplied together with the fmul instruction, and the resulting SSA value is returned.
A closer inspection of the resulting x86_64 assembly shows a series of 6 instructions. The first three being movsd, which copy the values from the stack (%rsp is the stack pointer), one by one into the SSE %xmm series of floating point registers. These are the result of the 3 alloca and store pairs in the IR. A grand portion of this function is just reading the stack.
This function solely uses the stack to pass arguments. Those familiar with calling conventions in computer architectures might realize that the stack is only used when all callee reserved registers are exhausted. Reading in values from registers are fast. Reading them in from the stack is slow. According to Microsoft, This x86_64 calling conventions dictates that the caller should pass the arguments to test by storing v1, v2, v3 in the first three in %xmm0-3 registers before passing anything to stack. Image pulled from link.
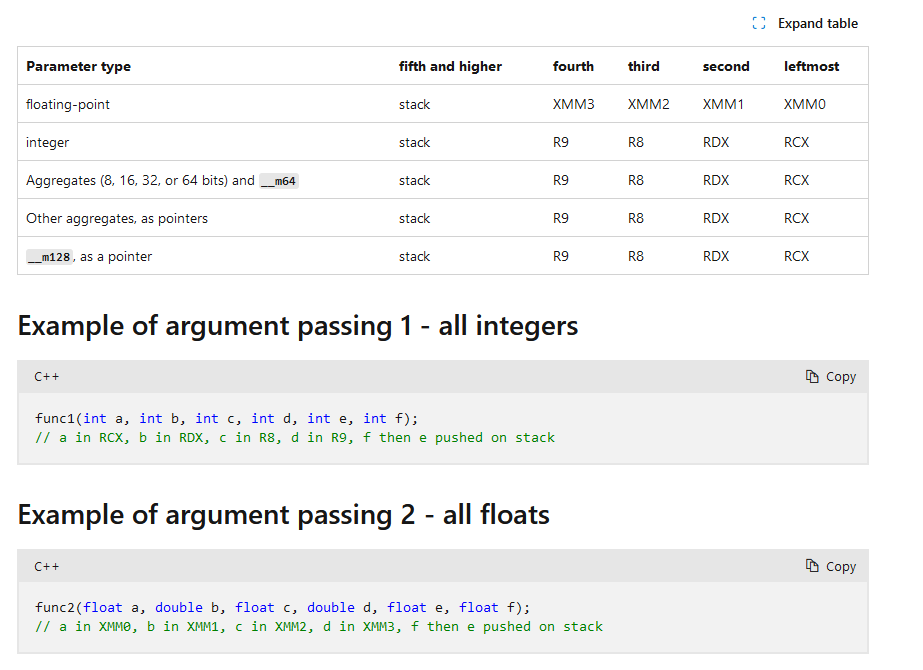
Had this convention been upheld, we would have saved ourselves many cycles of our CPU by avoiding all of this reading of the stack. We would have found these values already loaded in the floating point registers, ready to be multiplied.
LLVM is not to blame here; technically we did tell it to explicity use stack with alloca and use load instructions to read in these memory values into SSA registers, which accurately reflect in the resulting x86_64. This requires us to be more explicit about the optimization passes we are performing on the IR.
The mem2reg pass, aptly named, transforms LLVM memory objects into SSA registers, avoiding needless stack usage and indirection using load and store instructions. It is conscious of calling conventions across architectures, and can allow us to avoid using the stack in the resulting disassembly. Passing this pass using the CLI -passes flag demonstrates just as much.
kaleidrs$ cargo r -- --passes "mem2reg" --inspect-ir --inspect-asm
    Finished `dev` profile [unoptimized + debuginfo] target(s) in 0.02s
     Running `target/debug/kaleidrs --passes mem2reg --inspect-ir --inspect-asm`
Ready >> def test(v1 v2 v3) v1 * v2 * v3;
LLVM IR Representation:
; ModuleID = 'kaleidrs_module'
source_filename = "kaleidrs_module"

define double @test(double %v1, double %v2, double %v3) {
entry:
  %multmp = fmul double %v1, %v2
  %multmp7 = fmul double %multmp, %v3
  ret double %multmp7
}

Assembly Representation:
        .text
        .file   "kaleidrs_module"
        .globl  test
        .p2align        4, 0x90
        .type   test,@function
test:
        .cfi_startproc
        mulsd   %xmm1, %xmm0
        mulsd   %xmm2, %xmm0
        retq
.Lfunc_end0:
        .size   test, .Lfunc_end0-test
        .cfi_endproc

        .section        ".note.GNU-stack","",@progbits


Ready >>
This single pass shortens our function from 6 instructions to 3 instructions, and avoids using any portion of the stack altogether, removing the bottleneck of having our CPU fetch from memory. The variables v1, v2, v3 are all passed via %xmm0, %xmm1, and %xmm2, just as the calling convention suggests. Remember: registers go zoom-zoom.
It behooves us then to add it as a default pass for our language now, so in addition to instcombine,reassociate,gvn,simplifycfg, we will also add mem2reg when no passes are supplied by user at command line.
A few notes on mem2reg are found below, taken from the original tutorial:
- mem2reg is alloca-driven: it looks for allocas and if it can handle them, it promotes them. It does not apply to global variables or heap allocations.
- mem2reg only looks for alloca instructions in the entry block of the function. Being in the entry block guarantees that the alloca is only executed once, which makes analysis simpler.
- mem2reg only promotes allocas whose uses are direct loads and stores. If the address of the stack object is passed to a function, or if any funny pointer arithmetic is involved, the alloca will not be promoted.
- mem2reg only works on allocas of first class values (such as pointers, scalars and vectors), and only if the array size of the allocation is 1 (or missing in the .ll file). mem2reg is not capable of promoting structs or arrays to registers. Note that the “sroa” pass is more powerful and can promote structs, “unions”, and arrays in many cases.
Author(s) of “My First Language Frontend with LLVM Tutorial” on llvm.org
User-defined Mutable Variables
So far we have only allowed users to read and mutate existing variables via memory objects. These can only be existing function parameters in our language. The next order of business is allowing users to create them at their discretion.
Note the function above called fibi where this idea is first introduced in the original tutorial. The method to create variables is used via a new keyword, var.
var a = 1, b = 1, c in …
The keyword is load bearing, and identifies a list of variables with possible right hand initializing expressions, along with an in keyword, followed by a code body that uses these variables. The initializer is optional as you can see, with a, b above having an initialization to 1, while c is left uninitialized. The tutorial actually defines these uninitialized cases to be defined implicitly as 1. These variables have explicit scope, and can only be used within the body following in.
Again, this will require a update to our lexer/parser/AST in order to capture this new kind of expression:
// in lexer.rs
#[repr(u8)]
#[derive(Debug, Clone, Copy, PartialEq)]
pub enum Token<'src> {
    FuncDef = 1,
    Extern = 2,
    //...
    Var = 17, // "var" keyword
    Unknown(&'src str) = 255,
}

#[inline(always)]
fn tokenize(string: &str) -> Token {
    use Token::*;

    match string {
        // Keywords
        "def" => FuncDef,
        "extern" => Extern,
        "if" => If,
        "then" => Then,
        "else" => Else,
        "for" => For,
        "in" => In,
        "unary" => UnaryOverload,
        "binary" => BinaryOverload,
        "var" => Var,

    //...

// in ast.rs
#[derive(Debug, Clone, PartialEq)]
pub enum ASTExpr<'src> {
    NumberExpr(f64),
    VariableExpr(&'src str),
    //...
    VarExpr {
        // var_names is a combination of variable name and (possible)
        // initializer
        var_names: Vec<(&'src str, Option<Box<ASTExpr<'src>>>)>,
        body: Box<ASTExpr<'src>>,
    },
}

// in parser.rs

/// varexpr ::= 'var' identifier ('=' expression)?
//              (',' identifier ('=' expression)?)* 'in' expression
fn parse_var_expression<'src>(
    tokens: &mut Peekable<impl Iterator<Item = Token<'src>>>,
) -> ExprParseResult<'src> {
    // Swallow the var keyword
    let _ = tokens.next();

    let mut var_names = vec![];

    // Loop over the list of comma delimited variables
    // with possible initializers
    loop {
        let Some(Token::Identifier(name)) = tokens.next() else {
            return Err(ParserError::ExpectedToken("<identifier>"));
        };

        // If there is an assignment operator following,
        // it has an initializer, parse it and add it along
        // with name, otherwise there is no initializer
        if let Some(Token::Operator(Ops::Assign)) = tokens.peek() {
            let _assign = tokens.next();
            let init = parse_expression(tokens)?;

            var_names.push((name, Some(init)));
        } else {
            var_names.push((name, None))
        }

        // If we have a comma following, we loop, otherwise,
        // we break out of loop
        if let None = tokens.next_if(|t| matches!(t, Token::Comma)) {
            break;
        }
    }

    // Check for the "in" keyword, should be there before body
    tokens
        .next_if(|t| matches!(t, Token::In))
        .ok_or(ParserError::ExpectedToken(&"in"))?;

    let body = parse_expression(tokens)?;

    Ok(Box::new(ASTExpr::VarExpr { var_names, body }))
}
Implementing codegen for this new kind of expression is just iterating through a list of new variables to initialized as LLVM memory objects, calling codegen on any possible initializers, and storing initial values inside with store. There is also a bit of shadowing logic here where the variables can shadow the scope of any outer variables that share the same name.
// in llvm_backend.rs, ASTExpr::codegen()...

VarExpr { var_names, body } => {
    let mut shadowed_vars: Vec<(&str, PointerValue<'ctx>)> = vec![];

    let function = context
        .builder
        .get_insert_block()
        .unwrap()
        .get_parent()
        .unwrap();

    // For each variable in the list, attempt to emit initializer
    // code (if there was one given) else we give the
    // default initializer to zero so that LLVM pointer value does not
    // point to unitialized stack memory
    for (ref var_name, init) in var_names.iter() {
        let var_init_codegen = init.as_ref().map_or_else(
            || Ok(context.context.f64_type().const_zero()),
            |initializer| {
                initializer
                    .codegen(context)
                    .map(AnyValueEnum::into_float_value)
            },
        )?;

        // Allocate stack for variable, get pointer value
        let var_ptr = context.create_entry_block_alloca(function, var_name);

        // Store the initializer generated value, or the default of 0.0
        context
            .builder
            .build_store(var_ptr, var_init_codegen)
            .expect("FATAL: LLVM failed to build store instruction");

        // Shadow any possible variables that have same names,
        // override outer scope with inner scope. Do this by
        // saving the old variable pointers in shadowed_vars vec,
        // inserting the others in place
        if let Some(old_var_ptr)
          = context.sym_table.borrow().get(*var_name).copied()
        {
            shadowed_vars.push((var_name, old_var_ptr));
        }

        context
            .sym_table
            .borrow_mut()
            .insert(var_name.to_string(), var_ptr);
    }

    // Generate the body that is scoped to these mutable variables
    let body_codegen = body.codegen(context)?;

    // Delete new bindings, we are done with them after body generation
    var_names.iter().for_each(|(name, _)| {
        context.sym_table.borrow_mut().remove(*name);
    });

    // Restore old bindings, the variables we might have shadowed
    shadowed_vars.iter().for_each(|(name, ptr_val)| {
        context
            .sym_table
            .borrow_mut()
            .insert(name.to_string(), *ptr_val);
    });

    Ok(body_codegen.as_any_value_enum())
}
Testing the Iterative Version of Fibonacci Number Calculation in Kaleidoscope
Remember the above example, taken from the original tutorial’s introduction to the idea of mutable variables in Kaleidoscope?
# Define ':' for sequencing: as a low-precedence operator that ignores
# operands and just returns the RHS.
def binary : 1 (x y) y;

# Recursive fib, we could do this before.
def fib(x)
  if (x < 3) then
    1
  else
    fib(x-1)+fib(x-2);

# Iterative fib w/ mutable variables
def fibi(x)
  var a = 1, b = 1, c in
  (for i = 3, i < x in
     c = a + b :
     a = b :
     b = c) :
  b;
Now that we have implemented mutable variables, we can use this code as a test run to see if mutable variables work. This amount of code, however, is quite a lot to type into our REPL line-by-line to JIT. To both showcase the utility of our compiler, as well as save myself from the trouble of typing, I will copy this file into fib.ks, and compile it to an object using cargo r — fib.ks -o fib.o.
Taking this object, we can make a small C program that can take the symbols from fib.o and call them to use the iterative computation of fibonacci numbers to calculate the 20th fibonacci number:
#include <stdio.h>


extern double fib(double);
extern double fibi(double);


int main(void) {
    printf("The 20th fibonacci number is: %.0lf\n", fibi(20));
    return 0;
}
Compiling this C code, along with the fib.o object with clang nets us an executable we can run and test the Kaleidoscope function. The rest is history.
kaleidrs$ clang test.c fib.o -o test
kaleidrs$ ./test
The 20th fibonacci number is: 6765
kaleidrs$
The Kaleidoscope Development Experience
With these extensions, our language has matured quite a bit. Covering this much leaves room for little else, save for curtailing this extremely long blog post with a succinct conclusion concerning my efforts writing nearly 2000 lines of code.
The development experience with Rust and Inkwell was fairly smooth. I encourage readers to explore more about this technology, either by extending what I have so far in my Github repo, or by creating their own language. I can understand that this wrapper library may fall short in some areas, especially for more complex projects that use newer and more advanced pieces of LLVM. But for the case of building a simple model language, there is no contest. Inkwell, along with Rust, make for great training wheels that prevent users from misusing LLVM resources and introducing undefined behavior into the already complex application that is a compiler.
Leave a Reply